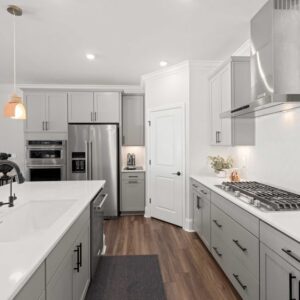
A kitchen is one of the most frequented and revered locations; it is the birthplace of many firsts, new experiences, and testers who may go on to become world-famous. All of the magic can take place in this location.
Because it is a location where you spend your happiest moments, it must have the appearance of being a cheerful place that shouts you, an area that is current but has all of the historical jewels, recipes, and mixtures.
All the plans that you make to redo your kitchen entirely may end up costing you a fortune if you try to implement it. However, if you want to give your kitchen a new appearance without spending a fortune on it, you may go the cheap route and give it a distinctive style by refinishing or revamping it. While this may appear to be a tough and time-consuming process, it is actually rather easy.
Very simple kitchen refinishing and painting methods to give it a whole new look
1. Refacing those cabinets does the work!
While a complete kitchen redesign is necessary every 5 to 6 years, depending on usage, it is also vital to maintain making little changes and refacing to never grow tired of your kitchen and help it become the creative environment that you, as a budding or developed chef, deserve.
The cabinets installed in the kitchen contribute significantly to the overall appearance of the area. Kitchen cabinet refinishing is necessary to maintain the kitchen functional, orderly and to increase the quality of life. It’s no surprise that cabinet refacing costs around half the price of installing new cabinets. A little touch-up and refacing are all that are required to improve the appearance of the cabinetry. This technique is also very eco-friendly because it encourages recycling and resulting in reduced waste generation.
To refinish your cabinets, you need to:
I) Clean those dusty surfaces!
We recommend that you begin this job by carefully cleaning your kitchen cabinetry before restoring it. To accomplish this, gently remove the cabinets from the walls, clean them, and allow the wood to cure completely for the rest of the process to go as smoothly as possible.
Mark or number the cabinet doors to help you remember where you put them.When sanding or painting, avoid sanding or painting over the markings. The hinge holes must also match so that you can readily tell which door belongs where.
II) Remember, we’re working with the cabinets ONLY!
Drop cloths should be utilized to protect the surfaces, appliances, and flooring.When using a wood cleaner, remember to wear gloves and eye protection.
III) Soak the hardware and ONLY the hardware!
Place the hardware in a big bowl with soapy for up to 30 minutes since it is possible that it also has to be cleaned. Before washing, softly clean them with a gentle sponge. Allow the hardware to dry fully once it has been cleaned. Then, add varnish and let the parts dry once more before putting them up!
IV) Strip cabinets!
It’s now time to strip your cabinets, which is where things may become complicated. To begin, ensure that your workstation is well-ventilated, ideally outside. To identify which stripping solution is appropriate for your cabinets, first determine what sort of finish is currently on the wood. If you suspect the cabinets have a wax finish, for example, you’ll need to apply a few drops of turpentine to the wood. You are right if the solution dissolves. Other options include shellac, lacquer, paint, vinyl, polyurethane, varnish, penetrating oil, or a water-based finish, each with its own set of removal and care instructions.
V) 3 Step rule: Sand, Prime, Paint!
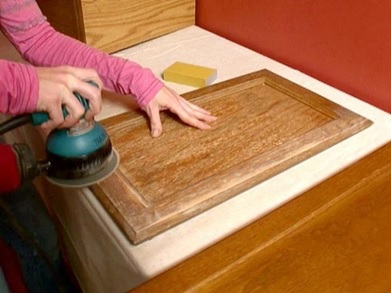
After you’ve finished with the stripping solution, fill any holes or scratches in the wood using wood putty and lightly sand the patch once it’s dry. The remainder of the cabinets should also be sanded, which is why, as said before, it would be preferable to conduct this job outside. Finally, apply a fresh layer of paint to the cabinets, keeping in mind that cold or hot conditions may cause the wood to expand. If you discover that the weather has revealed unfinished wood, apply another coat.
It’s also a good idea to put paste wax on cabinets that have been treated with piercing oils since the wax will provide further protection while harmonizing with the aesthetic of the finish.
After the paint has dry, gently replace your kitchen cabinets and hinges. It takes a significant amount of work to do this activity independently, so take advantage of this opportunity to give yourself some well-deserved praise.
2. Doesn’t paint fix it all?
It’s no shock that when you step into the room, the first thing that strikes you and draws your attention is the paint and textures on the wall. A nicely painted wall can transform the appearance of a space completely. It may make it appear trendy, smart, and comfortable, as well as high-end in some circumstances. Make sure to check out the paints popular with interior designers these days!
When discussing a kitchen, the kitchen must appear big. According to experts, the colors you pick for your kitchen should be on the warm hue spectrum of classic pastels that can light gloomy spaces and make them appear large.
3. Window treatment? Window treatment.
Nothing beats fried chicken, chocolate fried doughnuts, or any other meal that ends up in the fryer. However, frying and other related activities can cause a buildup of grease on the glass. As a result, you must grasp the significance of having greasy windows treated.
For an area like your kitchen, you must have a window shield or protectors covering the real glass, so the next time you get those windows changed, make sure that you obtain protectors to revamp your windows more easily.
4. Bring out all the lights.
A well-lit room is a welcoming space. It is critical that your kitchen, like every other area, be as bright as possible. This will not only give all of your delicacies the attention they deserve, but it will also give guests who enter your kitchen a warm greeting.
It is recommended that you complete the full lighting process throughout the renovation phase. After that, you may devote the remodeling process to layer lighting, overhead lighting, or even investing in a gorgeous kitchen chandelier that will undoubtedly help you raise your kitchen game.
We think that, like food, a kitchen is an essential component of one’s life. And so, in a nutshell, it should be redesigned regularly to maintain a new, bright appearance. So, never be afraid to invest in your kitchen’s quality, even if it means renovating it regularly. Allow your beautiful, sanitary kitchen, where you spend a lot of time, to affect your mood while also influencing your hygiene and nutrition.